If you have been painting with a brush for a while and feel that your finishes have reached their ceiling, an airbrush is the next natural step. It is not an exclusive tool for professionals or large workshops: with the right equipment and some practice, any modeller can achieve smooth gradients, thin and even layers, and weathering effects that are almost impossible to replicate with a brush. At Ministry of Hobby, we have gathered a selection of airbrushes designed for those working with slot cars, static models, fantasy figures, dioramas, and any miniature modelling project. The logic is simple: not all airbrushes are suitable for all techniques, and choosing wisely from the start saves frustrations and money in the long run.
Airbrushing in modelling has a particularity that distinguishes it from other uses: we work with small, often highly detailed surfaces, and we need millimetric control over the paint flow and spray pattern. An airbrush designed for illustration or nail art may work, but one designed with the needs of modelling in mind —fine needle, balanced body, easy disassembly for cleaning— makes a huge difference in the result. Here you will find exactly that type of tool, in various price ranges and features so you can start without oversizing your investment or make the definitive leap when your level demands it.
What is an airbrush and how it changes your painting method
An airbrush is a spraying instrument that mixes compressed air with liquid paint to project it in the form of a fine and controlled mist onto the surface. Unlike spray cans, it allows real-time regulation of the amount of paint, pressure, and working distance, which translates into absolute control over the final result.
In the world of modelling, this has concrete implications: you can apply completely uniform backgrounds without brush marks, create preshading effects by shading panel lines before applying the base colour, do post-shading by adding tonal variation over the already dry colour, or achieve oxidation, dust, and dirt effects with a naturalness that a brush cannot match. For those painting slot car bodies, airbrushing allows for the reproduction of racing liveries with sharp edges, applying finishing varnishes in even layers, and working with metallic paints without the typical brush strokes appearing.
Beyond slot, it is the reference tool for painting figures with techniques such as zenithal priming, Non-Metallic Metal, or colour backgrounds for layering. And in dioramas, it allows for the creation of gradient skies, war fog effects, or colour transitions in terrains that would otherwise take hours of work with a brush.
How to choose the right airbrush for your project
The first decision is the type of action. Single action airbrushes only regulate the airflow with the trigger; the paint flow is preset. They are easier to handle for absolute beginners, but limit control during application. Double action airbrushes —which are the majority you will find in modelling— allow for simultaneous regulation of air (by pressing down) and paint (by pulling back), which provides much greater freedom of stroke. Once you get the hang of it, double action becomes intuitive and you won’t want to go back to single.
The second factor is the needle and nozzle diameter. For miniature modelling, it is most common to work with needles ranging from 0.2 mm to 0.4 mm. With 0.2 mm, you can make very fine lines and work on small details, but the paint must be well diluted and the airbrush clogs more easily. With 0.3-0.4 mm, you have more versatility: suitable for both backgrounds and detail work, with less propensity to clog. If you are only going to have one airbrush, a 0.3 mm nozzle is the most recommended balance point.
The cup also matters: top gravity cups (the most common in modelling) require less air pressure to feed the paint and facilitate quick colour changes. Side-suction cups are more appropriate for large surfaces. And the needle material —usually stainless steel— influences durability and compatibility with aggressive solvents.
Finally, consider the compatibility with your paints. If you mainly work with modelling acrylics like Vallejo, Kaleido, or Tamiya, any well-built airbrush will work correctly with the appropriate dilution. If you use enamels or lacquers from the Ammo range or others, ensure that the internal seals of the airbrush can withstand stronger solvents.
Types of airbrushes and their main differences
Within the catalogue of airbrushes for modelling, we can distinguish several categories based on their design and use:
- Double action airbrushes with top cup: the standard in modelling. They allow for quick colour changes, good flow control, and are compatible with virtually all water-dilutable acrylic paints. Ideal for slot car bodies, figures, and models.
- Independent needle airbrushes (interchangeable needle airbrush): some models allow you to change the needle and nozzle without tools, making them very versatile if you need to alternate between fine detail work and background application in the same session.
- Gravity airbrushes with integrated cup: the cup is integrated into the body, reducing total weight and improving balance in the hand. Highly appreciated by modellers who work for hours on end.
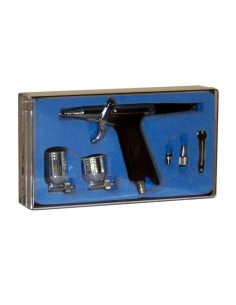
- Gun airbrushes (with large cup): designed for priming large surfaces or applying primers in large quantities. Less common in miniature modelling, but useful if you work with large-format dioramas or pre-paint many pieces at once.
Most modellers end up having at least two airbrushes: one with a fine nozzle for detail and another with a wider nozzle for backgrounds and primers. It is not essential to start this way, but it is a natural evolution.
Technical aspects to know before starting
The airbrush is only part of the system. For it to work, you also need a compressor that supplies clean and dry air at a stable pressure. In modelling, we usually work between 10 and 20 PSI (0.7-1.4 bar), although this varies depending on the paint, dilution, and type of work. A compressor with a tank will better dampen pressure fluctuations than one without a tank, which is especially noticeable in uniform backgrounds.
The dilution of the paint is one of the most critical points. Paint that is too thick will clog the needle; too diluted will not cover well and may run. As a general reference for modelling acrylics, a dilution of between 1:1 and 1:2 (paint:thinner) usually works well in 0.3 mm nozzles, but each paint has its own characteristics and it is advisable to test on paper or on scrap pieces before working on the final piece.
The maintenance of the airbrush is essential. A dirty needle or a nozzle with dried paint residue are the most common causes of spraying problems. Get into the habit of cleaning the airbrush between colours by passing thinner until it comes out completely clear, and do a deep clean —disassembling the needle, nozzle, and mixing chamber— at the end of each session.
Another aspect to consider is the working distance. At greater distances, the spray widens and the coverage is smoother but less precise. At shorter distances, the stream concentrates and the pressure can lift previous layers if they are not completely dry. For fine detail on figures or slot car bodies, working at 5-10 cm is usually the optimal range.
Practical tips for use and maintenance
Here are some of the learnings that quickly make a difference in practice:
- Always test on paper before applying to the piece. Check that the dilution is correct and that the airbrush works cleanly and without splatters.
- Always prime before painting. A layer of primer (whether spray or airbrush) improves paint adhesion and reveals surface imperfections that would otherwise remain hidden under the colour.
- Work in thin layers. Several light passes always yield better results than a single heavy pass. This is especially important with light colours over dark backgrounds.
- Clean between colours by passing water or thinner through the cup, spraying until the liquid comes out completely clean. With acrylics, water works well for intermediate cleanings.
- At the end of the session, disassemble the needle and nozzle and clean them with a cotton swab moistened with thinner. Check that no residue remains in the internal mixing chamber.
- Store the needles carefully. A bent tip —even slightly— ruins the spraying. Use the protectors or original covers when they are not mounted.
Common mistakes to avoid
There are mistakes that almost everyone makes at the beginning and that can be easily avoided with a little information:
- Undiluted or poorly diluted paint: this is the number one cause of clogs. Each range of paints has its own recommendations; do not assume that they all behave the same.
- Incorrect air pressure: working with too much pressure causes splatters and lifts previous layers. With too little pressure, the paint does not atomise well and may run. Always adjust before starting to paint the piece.
- Not cleaning after each session: dried paint residues inside the airbrush are difficult to remove and can permanently damage the nozzle or needle.
- Buying only by price: a very cheap airbrush without available spare parts on the market is a bad investment. Also consider the availability of replacement needles, nozzles, and seals.
- Not using a spray booth or mask: paint mist is harmful to the respiratory system. Always work with adequate ventilation and protection.
- Trying to do advanced effects without first mastering priming: before gradients and weathering effects, ensure you master uniform coverage and basic flow control.
Recommendations for beginners and advanced users
If you are starting
Start with a double action airbrush and a 0.3 mm nozzle. It is the most versatile format and the one that best tolerates the inaccuracies inherent in learning. You do not need the most expensive model in the catalogue, but one with accessible spare parts. Also invest in a compressor with a tank: stable pressure greatly facilitates learning. Practice first on paper and cardboard, not directly on models or bodies. And use paints you already know: Vallejo Model Air or Tamiya are good entry options because they are specifically formulated for airbrush and dilution with water.
If you already have experience
Once you master basic control, it is worth exploring airbrushes with 0.2 mm needles for fine detail, especially on figures or small elements of models. It is also time to investigate more advanced techniques: zenithal lighting, modulation with the Ammo range, chipping effects with Kaleido, or specific varnishes for decals and final protection. A second airbrush dedicated exclusively to backgrounds and primers saves cleaning time and allows you to work more fluidly.
| Nozzle |
Main use |
Recommended paints |
User profile |
| 0.2 mm |
Fine detail, lines, small figures |
Very diluted (1:2 or more) |
Intermediate / Advanced |
| 0.3 mm |
General use: backgrounds, base colours, medium detail |
Standard acrylics well diluted |
Beginner / Intermediate |
| 0.4 mm |
Large backgrounds, primers, preshading |
Less dilution needed |
Beginner / All levels |
| 0.5 mm or more |
Large surfaces, dioramas, massive priming |
Enamels, lacquers, thick acrylics |
Advanced / Large format |
Frequently asked questions about airbrushes in modelling
Do I need a specific compressor for modelling or is any one okay?
For modelling, it is advisable to use a silent compressor with a pressure regulator and, if possible, with a tank. DIY industrial compressors usually operate at pressures much higher than we need and are very noisy. There are compressors designed specifically for airbrushing that work between 0 and 4 bar quietly and controlled.
Can I use Vallejo paints directly from the bottle with an airbrush?
It depends on the type. The Vallejo Model Air and Game Air ranges are formulated for airbrush and allow minimal dilution. The Model Color or Game Color ranges are designed for brush and usually require more dilution for airbrush, approximately 1:1 or 1:2 with distilled water or specific thinner.
How long does it take to learn to use an airbrush?
For uniform coverage and clean backgrounds, a few hours of practice are sufficient. For advanced techniques such as controlled gradients or modulation, the learning curve can take weeks or months, but progress is noticeable quickly if you practice regularly.
What is the difference between a single action and double action airbrush?
In single action, the trigger only controls the air and the paint flow is preset. In double action, the trigger regulates both air (by pressing) and paint (by pulling back), allowing for much more control during the stroke. For modelling, double action is practically the standard.
Can I paint decals with an airbrush?
Decals are not painted with an airbrush: they are applied to the already painted and varnished surface. The airbrush is used to apply the matte, satin, or glossy varnish that protects the decals and integrates them into the surface.
How often should I change the needle?
A well-maintained needle lasts for years. Tips get damaged mainly from impacts or careless cleanings. If you notice that the airbrush spits instead of spraying evenly, inspect the needle tip under a magnifying glass: even a minimal deformation affects the result.
Is it dangerous to use an airbrush at home?
With the proper precautions, it does not pose a special risk. Always work in a ventilated space or with an extraction booth, use a mask with appropriate filters for the type of paint, and avoid accumulating mist in closed spaces. Water-based acrylic paints are less aggressive than enamels or lacquers, but respiratory protection is still advisable.
Can I use the same airbrush for enamels and acrylics?
Yes, as long as the airbrush has internal seals resistant to solvents. The important thing is to clean properly between one type of paint and another, using the appropriate thinner for each. Mixing acrylics with enamel residues without cleaning well can cause reactions in the paint and clogs.
What air pressure should I use?
As a general starting point for modelling with acrylics and a 0.3 mm nozzle, between 12 and 18 PSI (approximately 0.8-1.2 bar). For fine detail with a 0.2 mm nozzle, a little less. For backgrounds with a 0.4 mm nozzle or more, you can increase a bit. Always adjust on paper before applying to the piece.
Is it worth buying an airbrush kit with an included compressor?
It can be a good entry option if the included compressor has a regulator and manometer. Check that the airbrush in the kit has double action and a 0.3 mm nozzle, and that spare parts are available. Very low-cost kits sometimes include single action airbrushes or compressors without regulators, which greatly limits control from the start.